Saturday, July 13, 2013

Pepperjack Ranch Burger on a Grilled Cheese 'Bun'

These were so much fun to make!  I made them for my husband's birthday a few years ago.  I was inspired by the show Diners, Drive Ins, and Dives on the Food Network. 


Burger Ingredients:
  • A packet of dry Hidden Valley Ranch mix
  • 1 pound of ground beef
  • Diced onion
  • One egg
Combine ingredients and cook to desired doneness.

Other Ingredients:
  • A handful of frozen onion rings
  • 4 slices of bread per burger
  • Various sliced cheese (I used American for the grilled cheese 'buns' and Pepperjack for the burger)
  • Iceberg lettuce
  • Mayo/ketchup/mustard
  • A bit of butter for the grilled cheese
Start the onion rings as the burgers go on.  Cook at least one large onion ring for each burger.  If you really like onion rings go for more!

When there's about five minutes left for the burgers, make the grilled cheese buns.  You will need two per burger (one for the top of the bun, one for the bottom of the bun).

When everything is done layer it up and enjoy! 

Tip:  I stuck a butter knife through the burger when I served it, since I figured some people would prefer to cut it up to eat it - these end up being pretty tall! 


Saturday, June 15, 2013

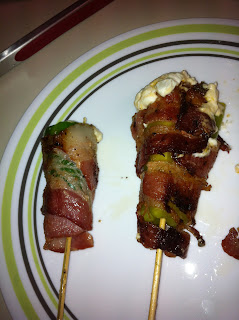
Bacon Wrapped Stuffed Jalapeno and Banana Peppers

At a get-together our friend made these amazing stuffed peppers - they were the hit of the party!  Since then my husband and I have each taken a shot at replicating them.  Both times were somewhat successful, but they just didn't quite match our friend's recipe.  The major difference - we used an indoor griddle, and his were on an open flame grill.

We chose a variety of sized peppers at our local grocery store.  Our favorite pepper was the banana pepper when we first tried these.  Go with whatever kind you prefer though.  You really can't go wrong. Just remember that you will be trying to wrap these with bacon...if the pepper is too big that gets a little more challenging.  Here's our cooking steps:
  • After removing the tops and cleaning out the seeds and veins, I made the filling.  We used a combination of cream cheese, sour cream, shredded mozzarella cheese, and shredded cheddar cheese.  We eyeballed the ingredients.  As long as you have a good amount of each, you'll be good to go.  
  • Next we stuffed each pepper with a good amount of the filling and then inserted a skewer through the bottom of the pepper, replaced each pepper's top, and stuck the skewer through it, too.  I heard that this helps to keep the stuffing inside as the peppers cook.  I also decided to use long skewer sticks to help when rotating the peppers as they cooked.
  • Finally, we wrapped each pepper with a slice of bacon.  This part was challenging in my opinion.  You can't overlap the bacon too much or it won't cook thoroughly.  But some overlap is needed to help keep each slice on the pepper.  This is where pepper size makes a big difference.  The bigger the pepper, you risk having gaps in the bacon.  The smaller the pepper the more overlap you'll have with the bacon (unless you cut the strips down).
  • Once the bacon was on, we popped these on the griddle and cooked and rotated.

...And cooked and rotated...and lost some cheese and pepper tops... and cooked and rotated...oh my gosh these things took forever to cook!  Good things are worth waiting for, right?  Clearly we found out that using a grill is the preferred method of cooking these suckers.  The bacon kept getting stuck on the griddle, the cheese oozed out all over the place.  It got messy. 

When they were finally done (i.e., when we decided that we were so hungry that we couldn't wait any longer) they did end up being delicious. 

If you haven't gathered so far, I recommend going the grill route to save yourself some frustration and to achieve the best flavor.  You could also probably boil the peppers a bit before putting them on a griddle to speed up the cooking time.  This recipe will definitely be something we my husband and I keep trying to improve.  Too good not to!

Happy eatings!


Saturday, June 8, 2013

Fun Anniversary Breakfast

On my husband and my anniversary, I decided to get a little creative in the kitchen.  I like playing around with food in muffin tins ever since I made omelets for a group of friends who were visiting for a weekend.  I got hooked on the idea of individual portions and mass production of delicious food.

Here's my original attempt at omelets - my inspiration for my anniversary breakfast.

I experimented with various ingredient layering patterns and egg cooking techniques.  I included spinach, red peppers, and cheese in this batch.  A few of these have a small piece of bread/toast on the bottom.  I preferred the scrambled version to the over hard version.  It's so simple though!  Just spray the muffin tin(s) and layer your ingredients!  I was cautious and cooked these for 25 minutes, but I'm sure they could have been done a little sooner.  The next time I made these I used hash browns on the bottom.  Yum!

So back to the anniversary breakfast.  Here's what brought a smile to my husband's face when we sat down for breakfast (try not to smile):


Isn't it cute?!

These are strawberry pancakes (in muffin tins) and scrambled eggs with spinach and onions.  You could use a variety of different pancake flavors if you choose to experiment. I have since tried blueberry pancakes and really enjoyed them!  Again super easy to make.  These took about 15 minutes. 

I always like to have fun with breakfast food!  It helps me become a little (very little) more of a morning person.  :-)


Sunday, January 6, 2013

Spaghetti with stuffed meatballs and leftover spaghetti pie

Spaghetti is one of the easiest dinners to make.  It's a classic family meal that is easy on the wallet.  It's one of my go-to meals when I don't have a plan when I get home.  That being said, it's nice to mix it up every once in a while to make spaghetti a little more memorable. 

So I decided to make meatballs stuffed with mozzarella cheese and top it with sauteed red peppers and fried spinach. 


Preheat the oven to 350F and start to boil the water for the spaghetti.
 
Meatball stuffing
You can use any kind of cheese that you like.  Just cut small cubes and set them aside until your meatball mixture is ready.  For simplicity I used mozzarella string cheese sticks.  They were very easy to work with and did not crumble.  Also I think mozzarella goes very well with spaghetti. 

Meatballs
Mix one pound of 85% fat ground beef with one egg, minced onion, a 1/4 cup of Parmesan cheese, a teaspoon of oregano, a dash of salt and pepper, and a teaspoon of garlic powder.  Then add 1/4 cup of Italian seasoned bread crumbs and start to formulate golf ball sized meatballs.

Next make an indentation in each meatball and insert a piece of the cheese that you cubed earlier.  Re-form the meatball to tightly seal the cheese inside of the meatball.  Place the meatballs on a baking sheet and bake for 25-30 minutes. Turn them over halfway through.  You will know that they are ready when they are fully browned and a bit of the cheese starts to peek through the meatball.

Spaghetti
Prepare the spaghetti as directed by the package.  When it is fully cooked, add the sauce of your choice. 

Peppers and Spinach topping / garnish
Clean then cut up a large red pepper and saute in a pan with butter until cooked through.  In the same pan or in its own pan, fry pieces of baby spinach in a bit of butter or oil until crispy.  This will top the spaghetti to add beautiful color, texture, and additional flavor.

Assemble the plates with as must of the toppings as desired.  Enjoy!

Leftovers
Now what can we do with that leftover spaghetti?  How about a spaghetti pie!


  1. Preheat oven to 350F.
  2. Lightly spray a pie pan with nonstick cooking spray.  
  3. Line the bottom and sides of the pan with flour or corn tortilla shells.  Tear the shells or overlap them if necessary.  Just make sure that the entire bottom and sides are covered.
  4. If you have any extra sauce, add it to the leftover spaghetti.  Also add diced vegetables to the spaghetti.  I used spinach and a bit of onion.  You could also add a bit of ricotta at this time.
  5. Now add the leftover spaghetti mixture to the pie pan.  
  6. Top with shredded cheese (mozzarella, mild cheddar, etc.)
  7. Cover the pie with foil and bake for 20 minutes.
  8. Remove foil and bake for an additional 10-15 minutes.
Cut and serve with a side salad.  Now you have a fun way to use those leftovers! 


Wednesday, November 7, 2012

Peanut Butter and Banana Stuffed French Toast

These were so easy to make.  One morning I woke up and was really craving stuffed french toast.  The only image in my mind was of the delicious, fruity stuffed french toast at IHOP.  That's the only kind that I've ever had...and until this particular day that was alright by me. 

I was about to settle for regular old french toast when I saw the fresh bananas on the counter that I bought a couple of days earlier.  The gears started turning and the obvious combo was bananas and peanut butter. 

Maybe some people would call it layered rather than stuffed, but these were delicious!  You really don't even need any syrup.  


I will be making these again!  Maybe next time I'll add a little honey on top or as an additional stuffing ingredient.

Saturday, October 13, 2012

Simple Ravioli? It Can Be Done!

I considered attempting to make ravioli from scratch on numerous occasions.  Then I read the recipe and realize that it requires a ravioli press and refuse to purchase a kitchen tool that I will only use once every year.  Then one day I subscribed to Pinterest and came across a great idea for super simple ravioli.

Enter...Won Ton Wrappers!


Mix 16 ounces of low fat ricotta cheese and one egg with your favorite veggie and/or cooked chicken/beef.  I used pureed broccoli and diced onions. 

Each won ton wrapper will hold about a tablespoon of the mixture.  Be careful to not over-stuff them or they will not hold together while cooking. 

Simply wet the edges of the wrapper and press them together to close them up.  I also used a fork to gently press the edges like pie crust.  Just don't poke or tear the wrapper as you work.  They will leak when you cook them if you do.

Boil the water while you are making the ravioli so it's ready when you have finished.  I found that about 5-6 ravioli will fit in the boiling water at once.  They only need about 4 minutes to be fully cooked. 

I topped my ravioli with a little mozzarella cheese and bacon!  Any sauce would be great, too...I just wanted something a little lighter. 

So won ton wrappers = excellent 'from scratch' ravioli dinner option. 

Sunday, September 23, 2012

Not Your Average Stuffed Peppers

For as long as I can remember, stuffed pepper recipes were limited to some kind of seasoned rice and ground beef or sausage mixture (not that there's anything wrong with that).  Growing up this is the version that my mom served.  Recently, I have seen a few intriguing recipes involving Tex-Mex ingredients like black beans and corn.  In my household this would not go over very well, so I got to thinking, "what could I incorporate to make an interesting stuffed pepper that everyone in my house would like?"  This is what I came up with:

"Tuna Casserole Stuffed Peppers"
  • Basmati Rice
  • Cream of Mushroom Soup
  • Large can of Tuna Fish (drained)
  • Diced onions
  • Fresh Broccoli (peas if you prefer)
  • Swiss Cheese
  • Salt, pepper, garlic

After choosing flat bottomed peppers that will likely stand up without assistance, be sure to properly clean the peppers (i.e., wash, cut off the top, remove membrane).  I always boil the peppers before stuffing and baking them.  It makes them softer and in my opinion enhances their flavor. Be sure to fully submerge the peppers in the water while they boil.  If they can't be fully submerged, just rotate them every couple of minutes.  They're ready when the outer skin looks like it's blistered.

I cooked the rice using a rice cooker and steamed the broccoli for a few minutes to lessen the baking time.  Then I combined everything in a large bowl and stuffed the peppers. 

The peppers stand up nicely in a lightly greased small glass casserole dish.  I then covered them loosely with foil and baked at 350 degrees for 20 minutes.  The bake time depends on how large your peppers are, if you precooked the stuffing ingredients, and how tightly you stuff the peppers.  Once all the ingredients have had time to heat up and 'mesh' flavors, I remove the foil and place one slice of swiss cheese on top for about 5 additional minutes. 

And that's it...super easy to make.  You could make different versions using a different type of pepper, various cheeses, or even decide to mix cheese in the stuffing rather than melting over the top.  My household tends to be impressed with 'gooeyness', so I went for the wow factor.  These make a pretty large portion, so if you prefer smaller portions, cut the peppers into halves prior to boiling.

Do you have a unique stuffed pepper recipe that you created?  How would you change the recipe to impress your family?